How to Install & Use a Trailer Sway Control Kit
Share article
If you’re considering installing a sway control on your hitch setup, you may be concerned about the level of effort involved. Is it something you can do yourself? Do you have the skills and tools necessary? Or do you need professional help?
Not to mention using your sway control once it’s installed!
In this guide, we’ll walk step by step through the basic process of installing a trailer sway control kit. We’ll cover the parts that make up a sway control, tools needed for the job, the steps involved, and some alternative sway control options to consider.
We’ll also provide some pointers on how to properly use a sway control while towing.
Contents
- Parts of a sway control kit
- Sway control installation video
- Sway control attachment options
- When to upgrade your sway control
- What to know before installing
- Tools needed for installation
- Sway control installation step-by-step
- Testing your new sway control
- Mistakes to avoid during installation
- How to adjust your sway control
- Tips for using your new sway control
- Sway control FAQs
Parts of a Sway Control Kit


Hitch-mounted sway control ball
This mini hitch ball attaches the sway control unit to the vehicle-side of the connection. The ball bolts onto a tab next to the primary hitch ball and allows the sway-bar-hitch connection to pivot as necessary for proper turning.
Slide bar
This metal bar slides in and out of the sway control unit and has a rough, abrasive texture to restrict this sliding motion and combat trailer sway. The open end of the slide bar attaches to the hitch-mounted sway control ball.
On/off handle
The handle allows you to engage or disengage tension on the sway control unit. You’ll need to switch between the on and off positions whenever coupling or uncoupling your trailer.
Trailer mounted sway control ball
This ball comes with a metal base and gets bolted onto your trailer frame. It provides the attachment point for the other end of the sway control bar.
Torsion screw
The torsion screw allows you to increase or decrease the resistance on the slide bar. Tightening the screw will provide greater resistance to the side-to-side motion, and loosening it will provide less.
Sway Control Attachment Options
Before you begin, you need to make sure you have a ball mount with a sway control tab. Most weight distribution hitches come with this tab (two tabs, in fact) already equipped. There are also specialized sway control ball mounts and weld-on options to add a sway tab if needed.
Complete Sway Control Kits
Electronic Sway Control as an Advanced Option
While traditional sway control systems use friction or mechanical resistance to limit trailer movement, newer electronic sway control systems offer a more advanced approach to stability. Instead of simply resisting motion once it begins, these systems are designed to actively detect and respond to unsafe trailer movement in real time, helping reduce sway before it becomes more severe.
One example is the CURT True Course™ advanced trailer sway control system, which uses motion-sensing technology to monitor how your trailer is moving behind your vehicle. If the system detects sway outside of normal conditions, it can automatically apply the trailer’s brakes independently of the driver or brake controller to help bring the trailer back under control.


Because it operates electronically, this type of system doesn’t rely on tension adjustments or friction settings. Instead, it uses a microprocessor to evaluate movement and react quickly in situations like crosswinds, sudden maneuvers, or slippery road conditions. This makes it particularly useful for drivers who frequently tow in changing environments or want an added layer of safety beyond traditional sway control methods.
Electronic sway control systems are typically installed as a module on the trailer itself and can often be integrated with mobile apps for system status and alerts, allowing you to monitor performance in real time. While they don’t replace proper loading or towing best practices, they can provide additional peace of mind by actively working in the background to help maintain stability.
For many towing setups, electronic sway control is best viewed as a complement to a well-balanced trailer and properly configured hitch system. Together, these elements create a more controlled, responsive towing experience, especially in conditions where trailer sway is most likely to occur.
When to Upgrade or Replace Your Sway Control System
Over time, your towing needs may change, and your sway control system should adapt with them. If you upgrade to a heavier trailer, travel longer distances, or frequently tow in challenging conditions such as high winds or mountainous terrain, it may be worth considering a more capable sway control solution. Modern systems offer different levels of control depending on how and where you tow.
If you’re deciding what to upgrade to, it can be helpful to think in terms of performance tiers:
Good: Sway Control Add-On Unit
A traditional sway control add-on, such as a friction sway control bar, is a simple and affordable way to improve stability for lighter trailers or occasional towing. It works by adding resistance at the hitch to reduce side-to-side movement, making it a solid entry-level option for improving control without changing your full hitch setup.
Better: Weight Distribution Hitch with Integrated Sway Control
For larger trailers or more frequent towing, a weight distribution hitch with built-in sway control provides a more balanced and stable setup. These systems help distribute weight evenly across the axles while also reducing lateral movement, creating a smoother and more controlled towing experience without needing separate components.
Best: Electronic Sway Control System
For the highest level of control, electronic sway control systems actively monitor trailer movement and respond in real time. Instead of relying on friction alone, systems like the True Course™ apply the trailer brakes automatically when sway is detected, helping restore stability during sudden maneuvers, crosswinds, or emergency situations. This type of system is ideal for frequent towing, longer trailers, or drivers looking for an added layer of safety and responsiveness.
Additionally, if your current sway control system shows signs of wear, such as reduced effectiveness, unusual noise, or visible damage to components, it may be time to replace it. Keeping your towing setup up to date ensures you maintain safe handling and reliable performance on every trip.


What to Know Before Installing Sway Control
Before installing a trailer sway control kit, it’s important to evaluate your overall towing setup, not just the hitch components. Sway control systems are most effective when your trailer is properly loaded, with correct tongue weight and balanced cargo distribution. Even the best sway control system cannot fully compensate for poor loading practices, so taking the time to confirm your setup will help ensure you get the full benefit once the system is installed.
You should also confirm that your hitch system is compatible with sway control components. Many weight distribution hitches already include sway control tabs or mounting points, but some setups may require additional hardware or modifications. Understanding these requirements ahead of time can help you avoid delays during installation and ensure a smooth, secure fit between your tow vehicle and trailer.


Tools Needed for Sway Bar Installation
Installing a trailer sway control kit usually requires standard hand tools such as wrenches, sockets, and a drill, along with the appropriate mounting hardware included in the kit. Depending on your setup, you may also need to install or modify a sway control tab or mounting point on your hitch, so having the correct tools on hand ensures a smoother installation process.
- Ratchet
- Socket set (SAE and metric)
- Drill bits
- Drill
- Marker
- Tape measure
Before getting started, it’s a good idea to confirm that you have the correct socket sizes for your hitch hardware, as well as a torque wrench if your installation requires specific tightening specifications. Using the proper torque settings helps ensure that all components are securely fastened without over-tightening, which can lead to premature wear or damage.
If your installation requires drilling into the trailer frame, a high-quality drill and appropriate metal drill bits are essential for clean, accurate holes. Taking the time to measure and mark mounting locations carefully will help ensure proper alignment and prevent the need for rework during installation.
You should also consider having a tape measure and marker on hand for precise positioning, along with safety gear such as gloves and eye protection when drilling or working with metal components. While these tools may seem basic, they can make a significant difference in both the efficiency of the installation process and the overall quality of the final setup.
Having all necessary tools ready before you begin allows you to complete the installation in one continuous process, reducing the risk of errors and helping ensure your sway control system is installed correctly and ready for safe towing.
Installing a Sway Control Step-by-Step
Step 1 - Attach the hitch sway control ball.
Insert the threaded stem of the ball into the hole of the sway control tab on your weight distribution hitch or ball mount. Use a wrench and the included nut and washer to securely torque the sway ball into place. Remember not to overtighten!


Step 2 - Measure for the location of the trailer sway ball.
The trailer-mounted sway control ball should be placed 24” back from the trailer coupler. Measure from the center of the coupler, along the trailer frame. The ball should be positioned on the outside edge of the trailer frame, and it should be 24” on-center from the coupler. Use the holes in the included plate to mark where the bolt holes will be drilled.


Step 3 - Drill pilot holes into the trailer frame.
Using the appropriately sized drill bit (refer to your specific owner’s manual), drill the four pilot holes needed for attaching the ball. Take your time and use caution. This step can sometimes be intimidating, but with the right tools and a little patience, it may be much easier than you think.


Step 4 - Bolt the trailer sway ball into place.
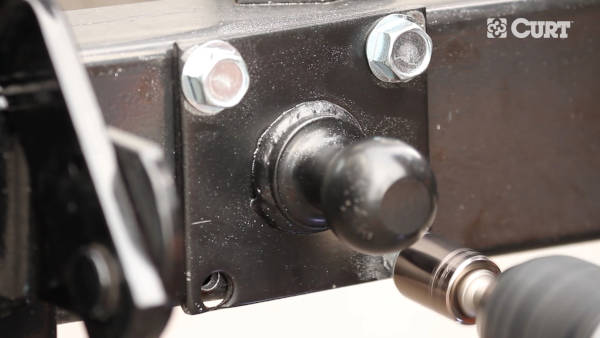
Position the trailer-mounted ball (and spacer plate, if included) over the four holes, and bolt it into place with the included self-tapping screws.

Step 5 - Attach the sway control bar onto the ball.
Release the tension on the slide bar by turning the on/off handle. Once released, the bar should slide easily. Place the slide bar socket over the hitch-mounted sway control ball and the other socket over the trailer-mounted ball. Secure each in place with the included clips. Then, reengage tension by rotating the on/off handle in the on direction.


Step 6 - Test your sway control unit.
With someone watching the sway control carefully, back up your tow vehicle slowly until the trailer is in a jackknife position. Make sure the sway control does not hit the trailer frame or bumper at any point. Then, pull forward and back up again so the trailer jackknifes in the other direction. Again, the sway control should at no point obstruct your other towing equipment. Also make sure that the sway control does not fully compress or come apart. If any of these occur when jackknifed, the sway control must be removed any time you back up your trailer.


How to Test Your Sway Control Setup
After installing your sway control system, it’s important to test it in a controlled environment before heading out on a long trip. Start with a short drive at lower speeds to ensure all components are functioning correctly and securely attached. Pay close attention to how the trailer responds during gradual turns and lane changes, as this will help you identify whether adjustments are needed.
To properly evaluate your setup, follow a simple test process:
- Begin with a low-speed test in an open area to confirm all components are secure and operating correctly.
- Gradually increase speed while monitoring trailer movement and stability.
- Perform controlled turns and lane changes to observe how the system responds.
- Pay attention to any excessive sway or stiffness that may indicate improper tension settings.
- Make small adjustments to the sway control tension as needed and repeat the test process.
As you continue testing, you should notice improved stability and reduced trailer movement, especially when encountering wind or passing vehicles. If the trailer still feels unstable or too rigid during turns, small adjustments to the tension settings can help fine-tune performance. Testing your setup ensures both safety and confidence before traveling on highways.
Common Mistakes to Avoid During Installation
When installing a sway control system, one of the most common mistakes is improper mounting placement. If the sway control balls or brackets are not installed in the correct position, the system may not function properly, which can reduce its effectiveness or create additional stress on the components. Taking accurate measurements and following manufacturer guidelines closely is essential for proper performance.
Another frequent issue is overtightening or undertightening the sway control tension. Too much resistance can cause difficult turning and unnecessary wear on the system, while too little tension may not provide enough sway reduction. Finding the right balance is key and typically requires minor adjustments after installation based on your towing conditions.


Removing the Sway Control Unit
The steps above cover a complete sway control installation and setup. However, once the unit is installed, it can easily be detached whenever you unhitch your trailer. To do so, simply rotate the on/off handle to the off position, pull out the clips and remove the entire sway bar. The sway control balls can actually stay in place permanently.
How to Adjust Your Sway Control Unit
There are many things that can affect trailer sway, from weather and road conditions to the way you load your cargo. Check out our guide on causes of sway control for more information.
Sometimes, an adjustment is required to ensure the proper amount of sway control for your vehicle-trailer setup.
To adjust your sway control, you’ll need to turn the tension screw. However, we recommend starting with the factory settings. Your sway control unit should come preset with the right amount of tension for an average load.
Once your new sway control is installed, road test it without changing the factory settings.
If the factory settings don’t provide enough control, an adjustment may be needed. You can increase the resistance by tightening the tension screw. Turn the screw 1/4-turn at a time.
After making each incremental adjustment, road test your towing setup until the proper sway control is achieved.
Tips for Using Your Sway Control
- Periodically lubricate the on/off handle. Exposed to the outdoor elements, the handle can become stiff or even seized without lubrications. Place a single drop of oil on the threads regularly to keep the handle turning smoothly.
- Never lubricate or paint the slide bar. Lubricating the handle is good. Lubricating the slide bar is not. The slide bar relies on consistent friction to combat trailer sway. Any kind of lubricant, including paint, will reduce this vital friction.
- Use two sway control units on larger trailers. Heavier trailers, longer trailers and even broad-sided trailers can be more stubborn when it comes to sway. Once they start rocking, they don’t want to stop! If one sway control unit doesn’t cut it, you may need to install a second on the other side of the trailer frame, and most weight distribution hitches are already equipped with two sway tabs.
- Keep your sway control clean. Road grime, dust and the outdoor elements can make your sway control dirty and affect its performance. When installing a sway control for the first time, it is recommended that you clean it after the first 1,000 miles of use. Remove the slide bar and scrub it with a wire brush or steel wool. After that, the slide bar only needs to be cleaned about every 10,000 miles.
- Be cautious with short-wheelbase vehicles. As a general rule, the shorter a vehicle’s wheelbase (meaning the distance from the center of the front wheel to the center of the rear wheel), the more prone it is to trailer sway. Short-wheelbase vehicles are also more greatly affected by a trailer in sway. If you’re making a decision about which vehicle to tow with, choosing one with a longer wheelbase will likely work in your favor to combat trailer sway.
- Don’t use a sway control with surge brakes. Surge brakes are a type of brakes built into some trailers, particularly boat trailers. These are different than electric brakes, relying on the momentum of the trailer to help with brake accentuation. Unfortunately, if your trailer is equipped with surge brakes, you won’t be able to use a sway control unit.
- Don’t speed up if sway occurs. Trailer sway increases with speed. When you’re towing a trailer and experience a sway event, sometimes your instinct is to speed up in an attempt to straight out the trailer’s course. This will only make things worse. If sway occurs, slow down! If sway continues, you should bring the vehicle and trailer to safe stop and inspect your towing setup to figure out the cause.
- Load your trailer properly. How you load your trailer can have a major influence on trailer sway. In general, more weight should be placed in front of the axle (follow the 60/40 rule!) to create proper tongue weight. If your trailer is tail-heavy, it will tend to sway. Also be sure to balance the load from side to side.
- Don’t use sway control in slippery conditions. A sway control unit is designed for regular towing conditions. If roads are wet, snowy, icy or even too gravelly, a sway control will not help. If you must tow through these conditions, it is advised that the sway control unit be removed.
Sway Control Alternatives
If you’re looking for an alternative solution to trailer sway, the products below provide an upgrade over the classic sway control kit.
Frequently Asked Questions About Sway Control Installation
-
What is trailer sway control and why is it important?
Trailer sway control is a system designed to reduce or prevent the side-to-side movement of your trailer while towing. This motion can be caused by wind, road conditions, or improper weight distribution, and it can quickly lead to loss of control if not addressed. Sway control helps stabilize your trailer, making towing safer and more predictable.
-
How does a sway control system work?
Most sway control systems use friction or mechanical resistance to limit unwanted side-to-side movement between the trailer and tow vehicle. Components like a slide bar and torsion screw create adjustable resistance, helping keep the trailer aligned with your vehicle while driving.
-
Can I install a sway control kit myself?
Yes, many sway control kits are designed for DIY installation if you have basic mechanical skills and the proper tools. However, if you’re unsure about hitch setup, weight distribution, or drilling into the trailer frame, professional installation may be the safer option.
-
What tools do I need to install a trailer sway control kit?
Installation typically requires common tools like wrenches, sockets, a drill, and the mounting hardware that comes with the sway bar. The exact tools depend on your hitch type and whether you need to install a sway control tab or mounting points on your trailer frame.
-
Do I need a weight distribution hitch with sway control?
Not always, but many towing setups use both together. A weight distribution hitch helps balance the load across the vehicle and trailer axles, while sway control reduces lateral movement. Combined, they provide a smoother and more stable towing experience, especially for larger trailers.
-
How do I adjust sway control tension?
Sway control systems typically include an adjustable screw or handle that increases or decreases resistance. Tightening increases sway resistance, while loosening reduces it. Proper adjustment depends on trailer size, weight, and towing conditions, so it's important to make small adjustments at a time and to test drive carefully.
-
When should I disengage sway control?
You should disengage your sway control unit when backing up your trailer or making very tight turns. Keeping it engaged in these situations can put excessive stress on the unit, leading to damage, and can affect maneuverability.
-
What causes trailer sway in the first place?
Trailer sway is typically caused by a combination of factors that introduce lateral forces on the trailer. Common causes include improper weight distribution, insufficient tongue weight, strong crosswinds, passing vehicles, and uneven road conditions. These forces can cause the trailer to oscillate from side to side, especially if the towing setup is not properly balanced.
-
How do I know if my sway control is working correctly?
When sway control is working correctly, you should notice improved stability, reduced side-to-side movement, and a smoother towing experience overall. The trailer should track more consistently behind your vehicle, particularly at highway speeds. If you still experience noticeable sway, it may indicate a need for adjustment, load redistribution, or a review of your overall towing setup.
-
Is sway control necessary for all trailers?
Sway control is not mandatory for every trailer, but it is strongly recommended for travel trailers and heavier loads, especially when towing at higher speeds. Even for smaller trailers, sway control can provide added stability and confidence, making it a valuable safety upgrade for many towing situations.
-
Can sway control prevent trailer sway completely?
Most sway control systems are designed to reduce and control sway rather than eliminate it entirely. Proper loading, correct tongue weight, and safe driving practices still play a critical role in maintaining stability. Sway control works best as part of a complete towing setup rather than a standalone solution.
-
What maintenance does a sway control system require?
Maintaining a sway control system involves regularly checking for loose hardware, inspecting components for wear, and ensuring the tension is properly adjusted. Keeping the system in good condition helps it perform consistently and extends its lifespan, which is important for safe and reliable towing over time.