
Towing 101: Guide to Hitch Pin Sizes
Share article
If you’re a first-time trailer owner, you’ve probably discovered that hitches come in different sizes, based on the vehicle type and capabilities. The same is true of hitch pins, meaning if you’re purchasing a new hitch pin, you need to select the right one.
In this guide, we’ll walk you through how to choose the right size hitch pin to match your trailer hitch receiver. We’ll cover which pin fits which hitch class, as well as what options to consider when buying one.
What is a Hitch Pin?
First, let’s define what a hitch pin actually is. A hitch pin is a short metal rod, usually with a bent L-shape, that is used to secure a hitch accessory in a receiver tube. The pin passes through a hole in the side of the receiver, through the shank of the hitch accessory, and out the other side.
This is a standard hitch pin:

Other Types of Hitch Pins
There are also many different types of hitch pins used to secure receiver accessories, each offering a variety of benefits depending on the application. Here are some common hitch pin types:


Trailer Hitch Pin Size Chart
While there are lots of different types of hitch pins, when it comes to choosing the right size, there are some simple, standardized rules to follow, as shown in the chart below.
Hitch
Class
Receiver
Size
Pin
Diameter
Usable Pin Length
(excl. handle)
Class 1 hitch
1-1/4" x 1-1/4" receiver
1/2" pin diameter
2" minimum pin length
Class 2 hitch
1-1/4" x 1-1/4" receiver
1/2" pin diameter
2" minimum pin length
Class 3 hitch
2" x 2" receiver
5/8" pin diameter
3" minimum pin length
Class 4 hitch
2" x 2" receiver
5/8" pin diameter
3" minimum pin length
Class 5 hitch (2")
2" x 2" receiver
5/8" pin diameter
3" minimum pin length
Class 5 hitch (2-1/2")
2-1/2" x 2-1/2" receiver
5/8" pin diameter
3-3/8" minimum pin length
Class 5+ hitch (3")
3" x 3" receiver
5/8" pin diameter
4-7/8" minimum pin length
Note: Dimensions based on industry-standard hitch specifications
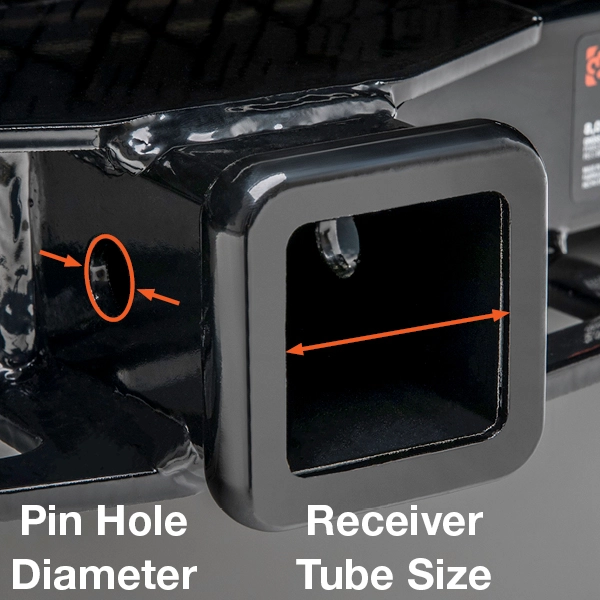
What is Pin Diameter?
Pin diameter refers to the thickness of the hitch pin. Because they have a cylindrical or circular profile, their thickness is measured as a diameter – the distance from one side of the circle to the other.
Your hitch pin needs to have the correct diameter in order to work properly with your towing system. Another way to think about it is to consider the hole in the side of your receiver. Your hitch pin needs to be the same size as that hole.

1/2” vs. 5/8”
There are two standard diameters when it comes to hitch pins: 1/2” and 5/8”. Virtually all receiver hitches and hitch-mounted accessories that follow industry-standard guidelines use one of these two pin sizes.
Furthermore, certain hitch classes and receiver sizes always use a uniform pin size. For example, all class 3 hitches require a 5/8” diameter pin.
Actual Pin Size Comparison

Keep in mind that a hitch pin listed with a 1/2” diameter is actually slightly smaller than 1/2” to allow it to fit snug but comfortably inside of the receiver pin hole. The same is true for 5/8”.
What is Usable Pin Length?
Diameter alone isn’t enough to determine the best pin for your hitch. This is where the plot thickens!
The other key dimension to consider is pin length, or more specifically, usable pin length.
There’s a difference between overall pin length and usable pin length.

Consider this: if the overall length of the pin is 3”, but the bent portion that makes up the handle takes up 1-1/2”, that only leaves another 1-1/2” of usable length. If your vehicle has a 2” receiver, this particular hitch pin wouldn’t fit!
When shopping for a replacement hitch pin or lock (more on this in a moment), make sure you know the usable pin length. Also, keep in mind that some pins may be longer than needed, but extra length usually isn’t a problem.
How Pin Size Relates to Hitch Class
Receiver-type trailer hitches are all categorized into five basic classes. The higher the class, the bigger and more capable the hitch.
And the bigger the hitch, the bigger the pin needed.
Class 1 and 2 hitches – like those you might find on a car or minivan – all use a 1/2” diameter pin with at least 2” of minimum usable pin length. This is because the receiver tubes on class 1s and 2s are always 1-1/4” x 1-1/4”. Remember, the pin has to pass all the way through the receiver to actually be safe and effective, and allow the hitch clip to be applied. If the inside width of the receiver is 1-1/4”, and the metal walls are nearly 1/4” thick, and there needs to be some margin for proper spacing, the minimum usable length is 2”.
For class 3, 4 and most class 5 hitches, it’s the same story, only their required pin diameter is 5/8” and their minimum usable length is 3”. This assumes a 2” x 2” receiver.
Where things get tricky is with heavier-duty class 5 hitches. Some class 5s have a 2” receiver, but others have a 2-1/2” or even 3” receiver. For these specialized hitches, the pin diameter remains at 5/8”, but pay extra attention to the usable pin length.
Again, the larger the receiver, the longer the pin needs to be.
Tips for Buying the Best Hitch Pin for your Vehicle
When browsing the internet or your local towing products supplier for a hitch pin, you’ll undoubtably ask the question, “What size hitch pin do I need?” The two most important things that help answer that question are pin diameter and usable pin length.
Start by measuring your receiver and confirming which size you have. You don’t necessarily need to know the class, but you definitely need to know the receiver tube size. Take the measurement from the inside edge of one wall to the inside edge of the other. The usable pin length should accommodate for this dimension. Refer to the chart above for how much usable pin length is required for your specific receiver tube size.
Next, measure the pin hole. Most hitches follow standardized dimensions as laid out in the chart above, but there may be some variations. To make sure you order the right pin, measure the inside diameter (I.D.) of the hole in the side of your receiver. The pin diameter should match the hole size.
Finally, when you go to purchase a hitch pin, buy from a reputable supplier. The manufacturer or retailer should display the dimensions on the packaging or with the product information. If you’re in a store, grab a tape measure and confirm the key dimensions of the pin, or ask an associate for help.
Different Types of Hitch Pins
Hitch pins come in all kinds of shapes and varieties. The standard hitch pin uses a wire retainer clip to keep it secured into the receiver tube. The wire passes through a hole on the end of the pin, ensuring that it will not vibrate free during travel.
A variation of the standard clip is the swivel clip – a built-in retainer clip that pivots to the lock or unlock position, as needed. Some hitch pins also have a groove on the end instead of a hole, allowing for easier application of the clip from any angle. Hitch pins also come in a variety of material and finish options, including steel, stainless steel, clear zinc-plated, black zinc-plated and more.
Types of 1/2" Hitch Pins
Types of 5/8" Hitch Pins
Despite all of the variations and alternative features, the importance of the key dimensions remains the same. You must select a hitch pin that has a diameter and usable length that will fit your receiver perfectly.
Hitch Pins with an Adapter Sleeve
Some hitch pins come with an adapter sleeve that allows them to fit multiple receiver sizes. The pin can be used without the sleeve (at 1/2” diameter) to accommodate smaller receivers, such as class 1 and 2. Or the sleeve can be placed over the top of the pin to provide a snug fit (at 5/8” diameter) for a larger hitch, such as a class 3.
Adapter pins are also designed with enough usable pin length to fit both receiver sizes.

What about Locking Pin Sizes?
The same dimensional rules that govern hitch pins also apply to hitch locks, a.k.a. locking hitch pins. A hitch lock is essentially a hitch pin with some kind of locking mechanism or device at the clip end. It is designed to pass through the receiver tube and hitch-mounted accessory shank to keep them in place, and it provides an extra level of theft deterrence, requiring a key for access.
If you’re upgrading your towing system with a hitch lock, remember to verify the usable pin length and the pin diameter, ensuring they’re a good fit for your receiver.

How to Install a Hitch Pin
Once you’ve measured, re-measured and finally purchased your hitch pin, installation is very easy to do.
After inserting your towing accessory into the receiver, simply line up the hole in the shank with the hole in the side of the receiver tube. Then, insert the hitch pin from the driver’s side of the vehicle, passing it through the lined-up holes. Because you were so diligent in measuring for the right size, the pin will pass all the way through and out the other side.
Finally, insert the clip or apply the retaining / locking mechanism.
Hitch Pin FAQs
1. How do I know what size hitch pin I need?
Hitch pin size is determined by the size of your receiver hitch. The pin must have a diameter that matches the hole in the side of the receiver and a length that allows it to pass all the way through the receiver and out the other side.
2. What size hitch pin for a 2" receiver?
Hitches with a 2” receiver require a 5/8” diameter pin with at least 3” of usable length. Verify the pin hole diameter of your hitch before purchase.
3. What size hitch pin for a 1-1/4" receiver?
Hitches with a 1-1/4” receiver require a 1/2” diameter pin with at least 2” of usable length. Verify the pin hole diameter of your hitch before purchase.
4. What is the standard size hitch pin?
There are two standard-size hitch pins: 1/2” and 5/8”. 1/2” diameter pins are designed to fit class 1 and 2 hitches, and 5/8” diameter pins fit class 3, 4 and 5.
Disclaimer: The photographs, recommendations and approximations provided in this post are intended for demonstration purposes only and do not reflect the specifications of any particular hitch, hitch pin or other product. Always consult the manufacturer’s Owner’s Manual.

